iD 編輯器
Reviewed 2019-06-10
你要用任務管理器為 HOT 或是 MissingMaps 等專案開始畫地圖嗎?請見我們的HOT-技巧區。
iD 編輯器是預設的,瀏覽器上的開放街圖編輯器。iD 速度快而且簡單易用,而且允許依據不同的資料來源,像是衛星或是空照影像,GPS 軌跡,Field Papers 或是 Mapillary。
使用 iD 編輯器編輯一些小的或簡單的變動,用不到像是 JOSM (更進階的繪圖編輯器)的進階功能,是相當實用的方式。這一章會示範用 iD 做基本的編輯。
啟動 iD 編輯器
- iD 編輯器需要時常連接至網際網路。
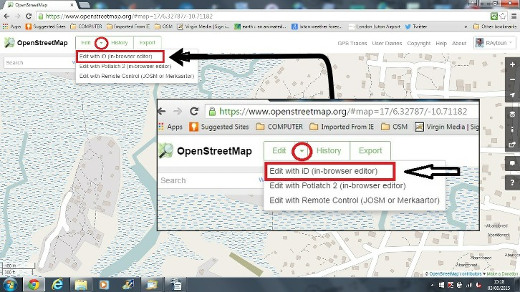
-⇥開放網頁瀏覽器,然後連到開放街圖網站 http://www.openstreetmap.org 。
- 使用你的開放街圖帳號登入
- 移動和縮放到地圖上你想編輯的地方。你可以按住滑鼠左鍵移動,拖拉到你想去的地方。
- 點選編輯旁邊的小箭頭,接著點以 iD (瀏覽器內編輯) 編輯。
iD 編輯器使用者界面
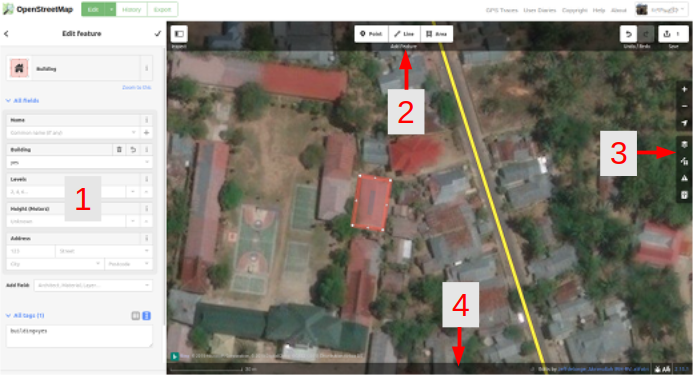
- 編輯圖徵面板:這個面板會顯示地圖上被選擇物件的標籤。
您可以透過此界面新増或修改標籤。
- 工具:這個面板顯示基本的編輯工具:
繪製點 (節點),快速鍵 1 
繪製線 (路徑),快速鍵 2 
繪製形狀 (多邊形),快速鍵 3 
復原,快速鍵 Ctrl+z 
取消復原,快速鍵 Ctrl+y 
Save changes, shortcut keys Ctrl+s 
- 地圖面板:這個面板顯示多個設定選項:
放大,快速鍵 + 
縮小,快速鍵 - 
顯示你的位置 
背景圖像設定,快速鍵 b 
地圖圖資,快速鍵 f 
Issues, shortcut key i 
開啟說明文件,快速鍵 h 
- 資訊面板: 這個面板顯示多項資訊,像是比例尺和那些使用者在這一帶貢獻。
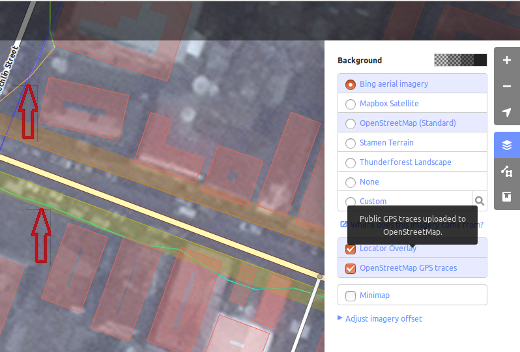
Configuring the Background Layer
點選背景圖像設定按鈕,或是使用快速鍵 b 
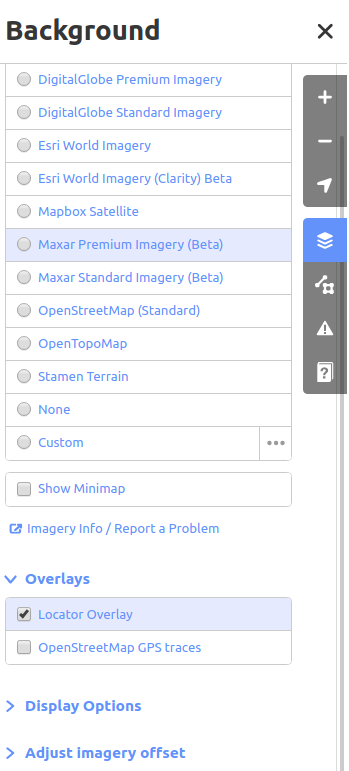
You can change the background layer based on your desired tile provider (the default is Bing Aerial Imagery).
你可以按客製化新增你自己的地圖圖磚。舉例來說,如果你想要新增 Field Paper [^fieldpaper],點選客製化,接著按放大鏡 (搜尋) 圖示開啟視窗 :-
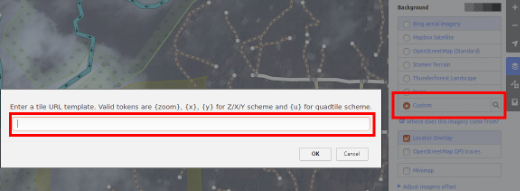
然後輸入你的 FieldPaper snapshot URL,就像這樣子:http://fieldpapers.org/snapshot.php?id=cqhmf2v9#18/37.80593/-122.22715
要顯示你電腦中的 GPS 軌跡 (GPX 格式),拖拉你的 GPS 檔案到 iD 編輯器裡。
要啟用 開放街圖 GPS 軌跡,請點選方框。下面的圖片中,公共的 GPS 軌跡用不同顏色顯示,表示旅行的方向。
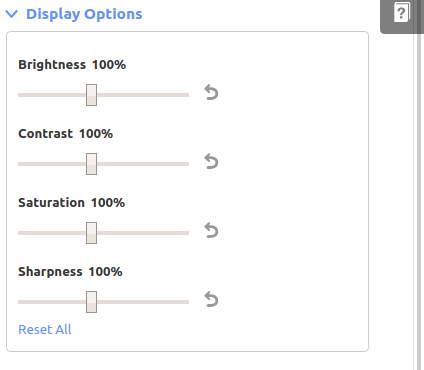
To change the appearance of the imagery click Display Options.
If there is imagery offset, you can correct the imagery offset by clicking Adjust imagery offset.
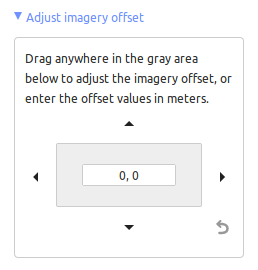
- 按位移按鈕移動影像。按重設鍵回到原先的位置。

以 iD 作基本編輯
新增節點
要新增新的點,請按點按鈕。
- 你的滑鼠指標會變成加號 (+)。現在點你想標注的位置,例如,如果你知道這一區的醫院在那裡,點選醫院建築的位置。
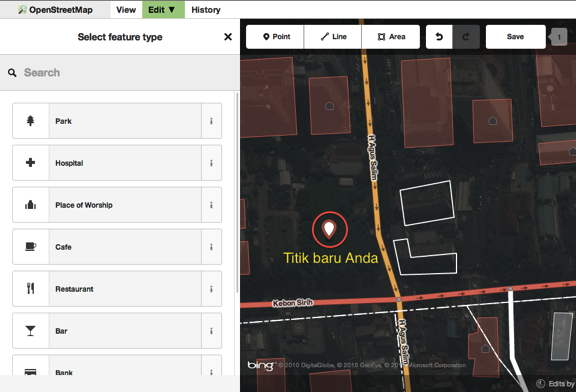
- 注意你加了新點了。同時在左邊面板會變成能夠填寫物件詳細資訊的表格型式。點醫院用地能夠將節點標示為醫院。
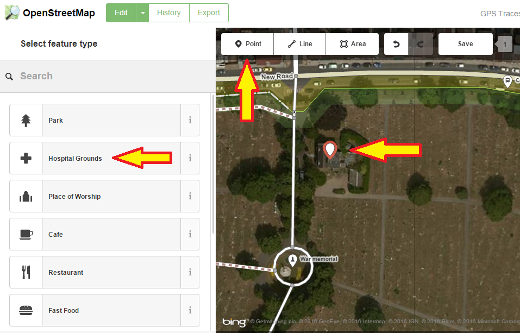
- 你可以用表格來填寫你的節點詳細資訊。你可以填寫醫院名稱、地址、和/或其他附加資訊。注意每一個圖徵會有不同選項,端示選了圖徵面板中那個標籤。
- If you make a mistake, such as a wrong location, you can move your point to a new location by holding the left mouse button on your point and dragging it. Or, if you want to delete your point, click the left mouse button on the point, activate the context menu by clicking with the right mouse button and then click the button which looks like a trashcan.

iD 編輯器的「點」其他是上面有特定「標籤』的獨立「節點」。
繪製線條
要新增線段,點線按鈕。
- 你的滑鼠指標會變成加號 (+)。找一個還未被畫上去的道路並描繪,點道路線段開始的地方然後開始描,接著按其他點延伸。按兩下結速繪製流程,注意左邊的資訊面板。
- 就像是加點,選擇對線段最適合的標籤。
- 你可以藉由用左鍵按線段的點,來拖拉線段的點。
- When you click your left mouse button on an individual point (node) on the line and either click on the right mouse button or hit the space bar to activate the context menu, you will see these tools:
- Continue line from this point

- Disconnect lines at this point

- Split a line into two lines at this point.

- Delete point from line.
- 當你對著線段按滑鼠左鍵(但不是在點上),你會看到這些工具:
- Create a circle from a line (only active if the line is closed)

- Disconnect line from other objects

- Move line

- Square all corners

- Reflect the line across its short axis

- Reflect the line across its long axis

- Reverse line direction (good for rivers & one-way streets)

- Rotate the line around its centre

- Straighten the line

- Delete line.

iD 編輯器的「線」通常是上面有標籤的「線段」。
關於刪除的特別記錄。一般來說你如果你能改進,應該避免刪除別人畫的部分。你可以刪除你自己造成的錯誤,但如果可以改進,你應該試著調整別人畫的物件。這樣一來能夠在OSM資料庫保存物件的歷史,尊重其他的圖客。如果你真的覺得應該刪除,請先詢問原先的繪製者,或是在OSM的郵件論壇先詢問。
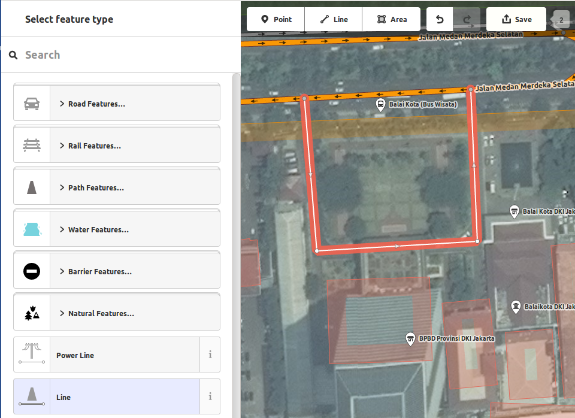
繪製形狀 (多邊形)
要增加新的多重多邊形,請點選區域按鈕。
- 你滑鼠指標會變成加號(+)。試著用影像當參考描繪建築。
你會注意到形狀的顏色會隨著添加的屬性而會變。
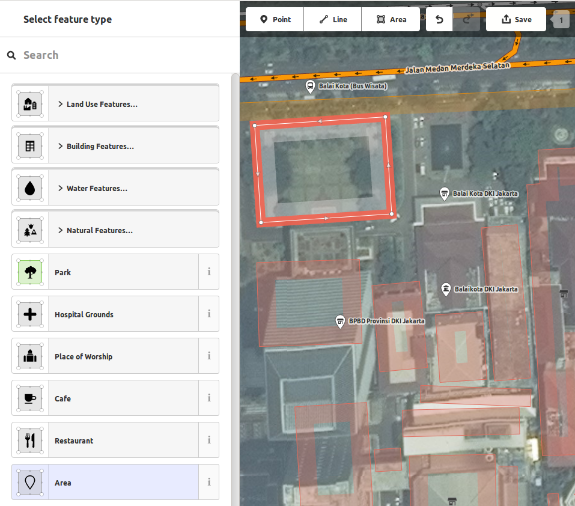
- 當你按滑鼠右鍵時,這些工具在你選擇形狀和啟用內容選單時可以用,就像你點線段時類似。
多邊形在 iD 編輯器裡實際上是有標籤的「封閉線段」。
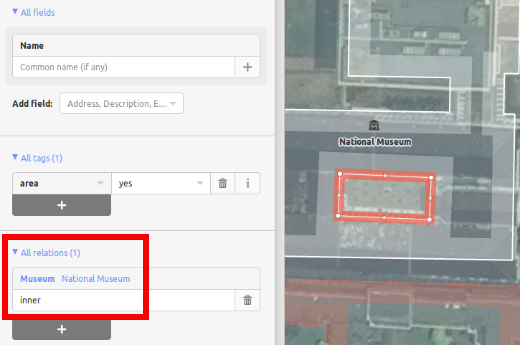
繪製多重多邊形
有時候你需要畫不只有外部輪廓,還有內部輪廓的情形。你可以想到房子裡有內院,或者是湖中有島嶼。不需要畫所有路徑變成單一線段,這樣你的內部輪廓與外部輪廓斷絕。請分開畫這些輪廓,並且只在外部輪廓加標籤,接著選取所有輪廓並且按 c,諤所有東西合併為多重多邊形。
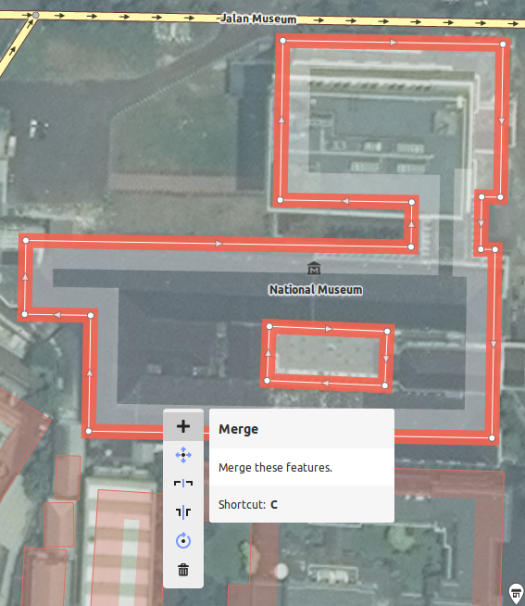
當你選擇新創建的多重多邊形輪廓的任何部分時,你可以在左側看到多重多邊形歸屬狀況
Issues
The editor performs a number of checks as soon as you edit something. If it thinks that what you did might cause problems it notifies you in the issues tab. Whenever the issues icon on the right carries either a yellow (for warnings) or red (for errors) dot you should open the tab and see what it reports. This information is also displayed in the object feature tab on the left if the relevant object is selected. You are also warned that there are unresolved issues when you upload your data.
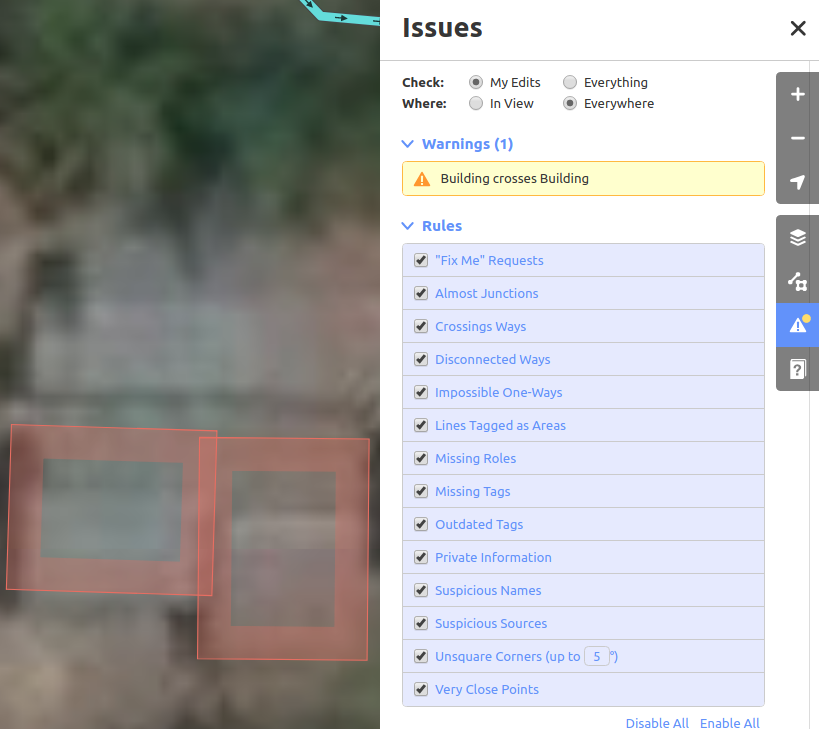

The lower part of the issues tab show the available rules and allows you to disable them individually though this is not recommended.
儲存您的編輯
當 (如果) 你想要儲存你的編輯到開放街圖,請點選儲存按鈕。左邊資訊面版會顯示上傳面版。
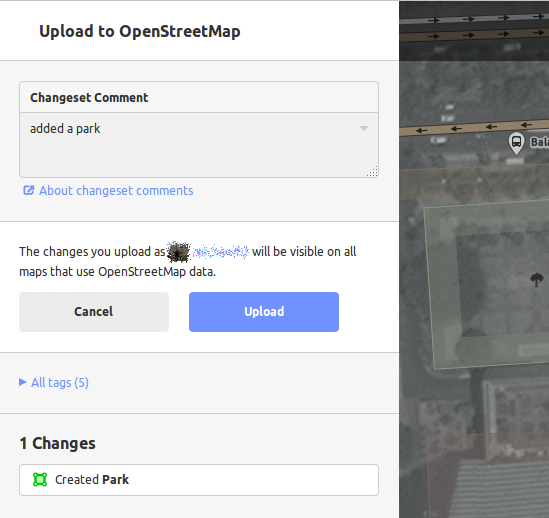
-輸入有關你編輯的註解,接著點儲存。
如果你編輯的圖徵 (點、線或面) 同時間別人也有編輯的話,會出現無法上傳的警告訊息,需要解決衝突-選擇保留那位的編輯&上傳你的變動。解決衝突常包括接受別人的編輯,通常你會希望回復問題物件,之後再編輯 (下次編輯後趕快儲存,嘗試避免再次衝突!)
額外資訊及自定義標籤
When you are editing an object, you will see an “Add field” menu at the bottom of the attribute panel. You can add various additional information by selecting one of the entries (layer, elevation, wikipedia etc.).
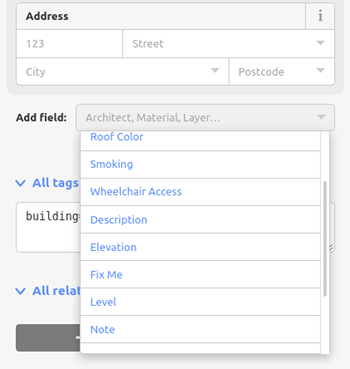
Or you can add custom tags by clicking All tags. 
- 這樣會顯示所有跟圖徵相關的標籤。
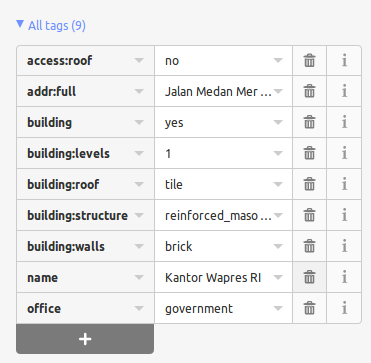
- 點選加號 (+) 增加鍵和值,或是點垃圾筒圖示刪除標籤。
更多教學
我們外部的資源頁面 提供來自不同來源的數倍影片教學。
iD vs JOSM
iD 適合…
- 當你在操作簡單的編輯
- 當你的網路速度夠快,能夠載入背景影像和儲存編輯
- 當你想要遵循一致和簡單的標籤規則
- 當你使用的電腦被限制無法安裝應用程式
JOSM是更好的選擇…
- 當你在增加許多棟建築 (請參考建築工具外掛)
- 當你編輯多個已存在的多邊形或線段。
- 當你的網路連線不穩或是處於離線狀態
- 當你使用特定的標籤規則 (或是客製化的預設組合)
[^fieldpaper]:關於 Field Papers,手冊中有 section of LearnOSM 的章節。
