iD အသုံးပြုတည်းဖြတ်ခြင်း
Reviewed 2019-06-10
Starting to map with a Tasking Manager for HOT or MissingMaps etc? See our HOT-tips section.
iDအသုံးပြုတည်းဖြတ်ခြင်း (iD Editor) မှာ အချက်အလက်များပေါ်အခြေတည်၍ browser မှတစ်ဆင့်မြေပုံပြင်ဆင်တည်းဖြတ်မှုပုံစံတစ်မျိုးဖြစ်သည်။ အသုံးပြုရ မြန်ဆန်လွယ်ကူပြီး ဂြိုဟ်တုနှင့် ကောင်းကင်ဓါတ်ပုံများ၊ GPS ၊ စာရွက်စာတမ်း သို့မဟုတ် မြေပုံများကဲ့သို့ အရင်းအမြစ်များမှ အမျိုးမျိုးသောအချက်အလက်များကို သုံး၍မြေပုံရေးဆွဲခြင်းကိုလည်း ခွင့်ပြုထားပါသည်။
မြေပုံတည်းဖြတ်မှုဆိုင်ရာအဆင့်မြင့်ဆော့ဖ်ဝဲလ်တစ်ခုဖြစ်သည့် JOSM ၏အဆင့်မြင့်အင်္ဂါရပ်များအသုံးပြုရန်မလိုသော အသေးစားနှင့် လွယ်ကူသောပြုပြင်ပြောင်းလဲမှုများတွင် iD အသုံးပြု တည်းဖြတ်ခြင်းသည် နည်းလမ်းကောင်းတစ်ရပ်ဖြစ်၏။ ဤအခန်းတွင် iD အသုံးပြုတည်းဖြတ်မှု၏ အခြေခံအကြောင်းအရာများကို ဖော်ပြသွားမည်ဖြစ်သည်။
iD Editor ဖြင့် စတင်ဆောင်ရွက်ခြင်း
- iD အသုံးပြုတည်းဖြတ်မှုအတွက် ကွန်ပျူတာကို အင်တာနက်ချိတ်ဆက်ထားရန်လိုသည်။
- အင်တာနက် browser ကိုဖွင့်ပြီး http://www.openstreetmap.org ဟုရိုက်နှိပ်ရှာဖွေပါ။
- သင်၏ OpenStreetMap အကောင့်ကို Login ဝင်ပါ။
- သင်တည်းဖြတ်လိုသောမြေပုံအပိုင်းကိုရှာဖွေပါ။ (mouse ၏ ဘယ်ဘက်ခလုတ်ကိုဖိထားလျက် မြေပုံကို သင်လိုရာအပိုင်းသို့ ရွှေ့ပြောင်းသွားလာနိုင်သည်။ )
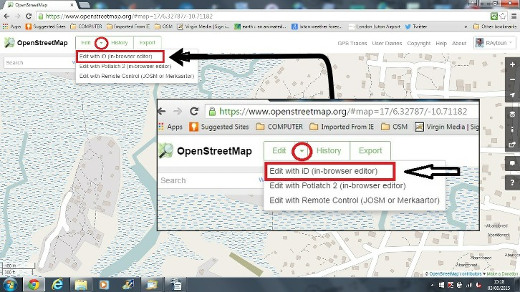
- ထို့နောက် Edit ဟုဖော်ပြထားသောခလုတ်၏နောက်တွင်ရှိသော မြားခေါင်းငယ်လေးကိုနှိပ်ပါ။ ကျလာသောအကွက်မှ Edit with iD (in-browser editor) ကို ရွေးချယ်ပါ။ အောက်ပါပုံတွင် ရှုမြင်နိုင်သည်။
ပြင်ဆင်တည်းဖြတ်မှုလုပ်ကိုင်ရန်အတွက်မြင်ကွင်း
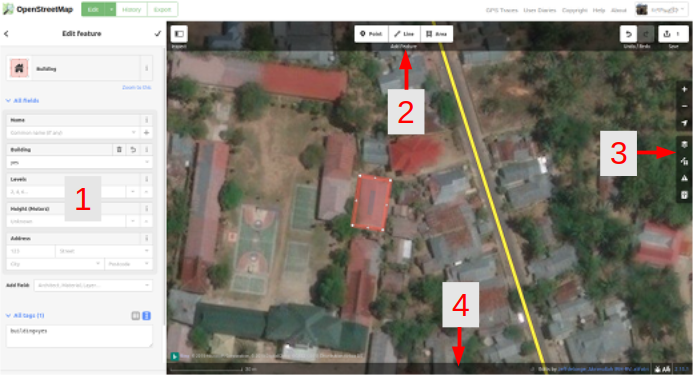
၁။ ပါဝင်သောအင်္ဂါရပ်များကိုပြင်ဆင်ရန်နေရာ ။ ။ မြေပုံပေါ်တွင်ရွေးချယ်လိုက်သောအရာဝတ္ထု၏ အညွှန်းကိုပြသည့်နေရာဖြစ်သည်။
လိုအပ်သလို ပြင်ဆင်ဖြည့်စွက်မှု ပြုလုပ်နိုင်သည်။
၂။ ကိရိယာများ ။ ။ ပြင်ဆင်တည်းဖြတ်ရန်ကိရိယာများကို ဖော်ပြထားသည့်နေရာဖြစ်သည်။
အမှတ်(အစက်) (ကွန်ပျူတာကီးဘုတ်မှ 1 ခလုတ် ဖြင့်လည်းသုံးနိုင်သည်)
မျဉ်းကြောင်း (ကွန်ပျူတာကီးဘုတ်မှ 2 ခလုတ် ဖြင့်လည်းသုံးနိုင်သည်)
ပုံသဏ္ဍာန် (ကွန်ပျူတာကီးဘုတ်မှ 3 ခလုတ် ဖြင့်လည်းသုံးနိုင်သည်)
ပြန်ဖျက်ရန် (ကွန်ပျူတာကီးဘုတ်မှ (Ctrl+z) ခလုတ် ဖြင့်လည်းသုံးနိုင်သည်)
ထပ်မံပြုလုပ်ရန် (ကွန်ပျူတာကီးဘုတ်မှ Ctrl+y ခလုတ် ဖြင့်လည်းသုံးနိုင်သည်)
Save changes, shortcut keys Ctrl+s 
၃။ မြေပုံ ။ ။ မြေပုံအတွက်ပြုပြင်ပြောင်းလဲမှုပြုရန် ညာဖက်ဘေးနေရာတွင်ဖော်ပြထားသည်။
မြင်ကွင်းချဲ့ရန် (ကွန်ပျူတာကီးဘုတ်မှ + ခလုတ်ဖြင့်လည်းသုံးနိုင်သည်)
မြင်ကွင်းချုံ့ရန် (ကွန်ပျူတာကီးဘုတ်မှ - ခလုတ်ဖြင့်လည်းသုံးနိုင်သည်)
နေရာတစ်ခုသို့သွားရန် 
မြေပုံတွင်နောက်ခံအလွှာပြောင်းလဲဖော်ပြရန် (ကွန်ပျူတာကီးဘုတ်မှ b ခလုတ် ဖြင့်လည်းသုံးနိုင်သည်)
မြေပုံအချက်အလက် (ကွန်ပျူတာကီးဘုတ်မှ f ခလုတ်ဖြင့်လည်းသုံးနိုင်သည်)
Issues, shortcut key i 
အကူအညီရယူရန် (ကွန်ပျူတာကီးဘုတ်မှ h ခလုတ်ဖြင့်လည်းသုံးနိုင်သည်)
၄။ သတင်းအချက်အလက်နေရာ ။ ။ မြေပုံ၏ အတိုင်းအတာနေရာစကေးနှင့် ထိုနေရာအတွက် ပေါင်းစပ်ဖြည့်သွင်းကြသူများ စသည့်အချက်အလက်များကိုပြသသည့်နေရာ ဖြစ်သည်။
Configuring the Background Layer
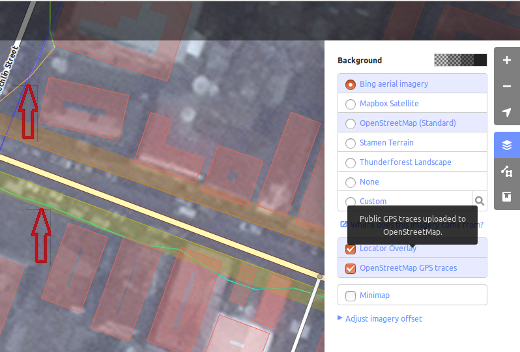
နောက်ခံအလွှာပြောင်းလဲရန် ကွန်ပျူတာကီးဘုတ်မှ b ခလုတ် သို့မဟုတ် ပုံတွင်ပြထားသည့်အတိုင်းနောက်ခံအပြင်အဆင်များ(Background settings) ကိုနှိပ်ပါ။
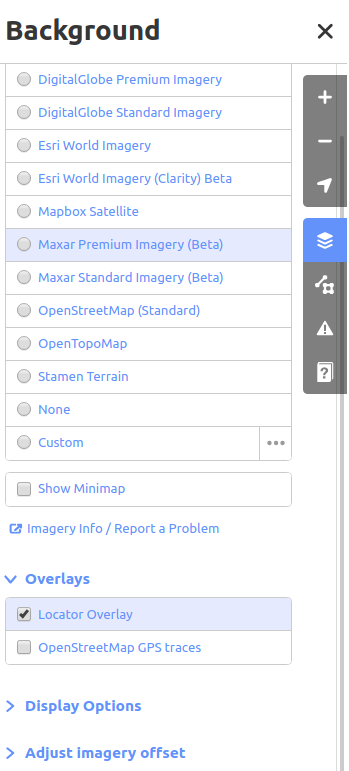
You can change the background layer based on your desired tile provider (the default is Bing Aerial Imagery).
မြေပုံဖော်ပြမှုကို ပြောင်းလဲလိုပါကCustomကိုရွေးပါ။ ရှာဖွေရန်အတွက် ဘေးနားတွင်ရှိသော မှန်ဘီလူးပုံသဏ္ဍာန်လေးကို နှိပ်ပါက အောက်ပါပုံအတိုင်းမြင်တွေ့နိုင်သည်။ ပုံတွင် Field Paper ထည့်သွင်းခြင်း ကို ဥပမာပြထား၏။
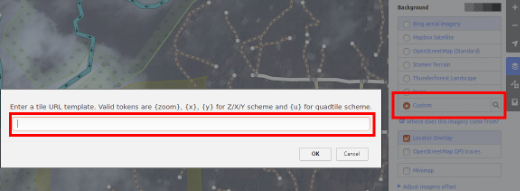
အောက်တွင်ဖော်ပြထားသောအင်တာနက်လိပ်စာ FieldPaper snapshot URLကို ကူးယူဖြည့်သွင်းပြီး လက်တွေ့ဆောင်ရွက်ကြည့်နိုင်ပါသည်။ http://fieldpapers.org/snapshot.php?id=cqhmf2v9#18/37.80593/-122.22715
သင့်ကွန်ပျူတာတွင် GPS လမ်းကြောင်းပြသရန်အတွက်(GPX ပုံစံဖြင့်) GPX ဖိုင်တခုကို iD Editor သို့ထည့်သွင်း အသုံးပြုနိုင်သည်။
OpenStreetMap မှကျန်ရှိနေမည့် GPS လမ်းကြောင်းများကိုမြင်ရစေရန်အတွက်OpenStreetMap GPS traces ဘေးရှိအကွက်ကိုနှိပ်ပါ။ အောက်ဖက်ရှိပုံတွင်ပြထားသကဲ့သို့ အများပြည်သူနှင့်ဆိုင်သော GPS လမ်းကြောင်းများ(public GPS traces) များသည်အရောင်မျိုးစုံဖြင့်ပြနေပြီး သွားရာလမ်းကြောင်းကိုညွှန်ပြနေပါသည်။
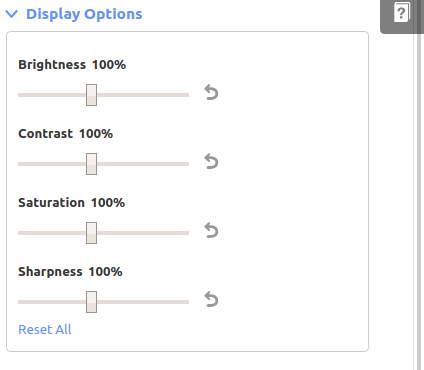
To change the appearance of the imagery click Display Options.
If there is imagery offset, you can correct the imagery offset by clicking Adjust imagery offset.
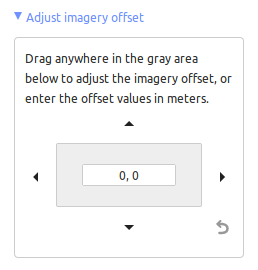
- နေရာပြောင်းလဲရွှေ့လျားရန်အတွက် မြားခေါင်းသဏ္ဍာန်ခလုတ်များကိုနှိပ်ပါ။ မူလနေရာသို့ပြန်သွားလိုပါက reset ခလုတ်ကိုနှိပ်ပါ။

iD ဖြင့်ပြင်ဆင်တည်းဖြတ်ခြင်းအခြေခံ
တည်နေရာမှတ်များထည့်သွင်းခြင်း
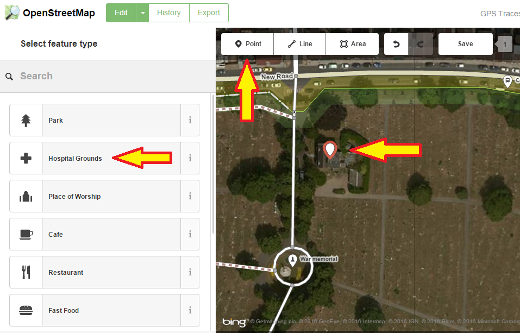
နေရာအမှတ်ပေါင်းထည့်ရန်အတွက်Point ခလုတ်ကိုနှိပ်ပါ။
- သင့် mouse ၏ ညွှန်ပြကိရိယာသည် (+) လက္ခဏာသို့ ပြောင်းလဲဖော်ပြမည်။ သင်သိရှိထားပြီးဖြစ်သော နေရာတစ်ခုသို့ရွှေ့လျက် နေရာအမှတ်အသားပြုပါ။ ဥပမာ … ဆေးရုံဟု သိထားသောနေရာ။
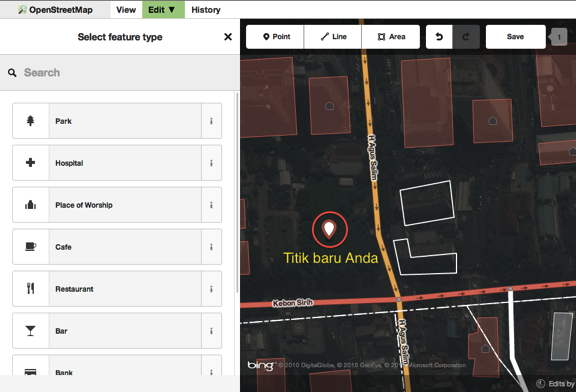
- ထိုသို့ထည့်သွင်းလိုက်သည်နှင့် မြေပုံ၏ဘယ်ဘက်နေရာသည် သင်ရွေးချယ်သောအရာ၏ အချက်အလက်များဖြည့်သွင်းရန် ပြောင်းလဲဖော်ပြမည်ဖြစ်သည်။ ဆေးရုံအဖြစ်အမှတ်အသားပြုလုပ်ရန် Hospital Grounds ကိုရွေးချယ်ပါ။ (အောက်ပုံတွင်ကြည့်)
- ယင်းနောက်အသေးစိတ်အချက်အလက်များ ဖြည့်သွင်းပေးနိုင်သည်။ ဥပမာ … ဆေးရုံအမည်၊ လိပ်စာ စသည်ဖြင့်။ သတိပြုရမည်မှာ သင့်ရွေးချယ်မှုပေါ်မူတည်၍ ဖြည့်သွင်းရမည့်အချက်အလက်များ အပြောင်းအလဲရှိနိုင်ပါသည်။
- If you make a mistake, such as a wrong location, you can move your point to a new location by holding the left mouse button on your point and dragging it. Or, if you want to delete your point, click the left mouse button on the point, activate the context menu by clicking with the right mouse button and then click the button which looks like a trashcan.

iD Editor အတွင်းသတ်မှတ်လိုက်သော “အမှတ်”တစ်ခုသည် သီးသန့်တည်ရှိနေသော နေရာ အမှတ်တစ်ခုဖြစ်ပြီး “ဖော်ညွှန်းချက်များ”လည်းပါရှိမည်ဖြစ်သည်။ ၎င်းကို “node” ဟုခေါ်သည်။
မျဉ်းကြောင်းများရေးဆွဲခြင်း
မျဉ်းကြောင်းဆွဲရန်အတွက်Line ခလုတ်ကိုနှိပ်ပါ။
- mouse ၏ ညွှန်ပြကိရိယာသည် (+) လက္ခဏာသို့ပြောင်းလဲဖော်ပြမည်။ မြေပုံတွင်မရေးဆွဲရသေးသော လမ်းကြောင်းတစ်ခုကို ရှာဖွေခြေရာကောက်ပါ။ လမ်းအစမှတ်တွင်တစ်ကြိမ်နှိပ်ပြီး mouse ကိုရွှေ့ပါ။ လမ်းကြောင်းတစ်လျှောက်တွင် အပိုဆောင်းထည့်သွင်းလိုသည်များရှိပါက တစ်ကြိမ်စီနှိပ်ပါ။ လမ်းအဆုံးမှတ်နေရာတွင် mouse ကို နှစ်ကြိမ်ဆက်နှိပ်ပြီး အဆုံးသတ်နိုင်သည်။ ထို့နောက် မြေပုံဘယ်ဘက်နေရာကိုကြည့်ပါ။ (အောက်ပုံတွင်ရှု)
- မြေပုံနေရာအမှတ်အသားပြုစဉ်ကအတိုင်း ရည်ညွှန်းချက်ဖြည့်စွက်ရန် Line ကိုရွေးပါ။
- လမ်းကြောင်းပေါ်ရှိ အမှတ်အသားပြုခဲ့သောနေရာများတွင် mouse ၏ဘယ်ဘက်ခလုတ်ကို ဖိနှိပ်လျက်လိုရာသို့ဆွဲယူနိုင်သည်။
- When you click your left mouse button on an individual point (node) on the line and either click on the right mouse button or hit the space bar to activate the context menu, you will see these tools:
- Continue line from this point

- Disconnect lines at this point

- Split a line into two lines at this point.

- Delete point from line.
- Mouse ၏ ဘယ်ဘယ်ခလုတ်ကို မျဉ်းကြောင်းပေါ်သို့နှိပ်ပါက အောက်ပါကိရိယာများကို မြင်တွေ့ရမည်ဖြစ်သည်။
- Create a circle from a line (only active if the line is closed)

- Disconnect line from other objects

- Move line

- Square all corners

- Reflect the line across its short axis

- Reflect the line across its long axis

- Reverse line direction (good for rivers & one-way streets)

- Rotate the line around its centre

- Straighten the line

- Delete line.

iD Editor တွင် ထည့်သွင်းရေးဆွဲထားသော “မျဉ်းကြောင်း”တစ်ခုသည် “ဖော်ညွှန်းချက်များ”ပါရှိသော လမ်းကြောင်းတစ်ခုအဖြစ်ရှိနေမည်ဖြစ်သည်။ ယင်းကို “way” ဟုခေါ်သည်။
*ပယ်ဖျက်ခြင်း **အတွက်အထူးမှတ်ချက် ။ ။ ယေဘုယျအားဖြင့် အခြားသူ၏မြေပုံထုတ်မှုကို မပယ်ဖျက်သင့်ပေ။ သို့မှသာ တိုးတက်မှုရှိသောမြေပုံအဖြစ်သို့ရောက်ရှိမည်။ ကိုယ်ပိုင်အမှားပြုလုပ်ချက်ကို ပယ်ဖျက်နိုင်ပြီး အခြားသူများ ထုတ်ထားသည့်အရာများ ပြောင်းလဲရန်လိုအပ်ပါက *ချိန်ညှိ ရန်ကြိုးစားပါ။ ယင်းသို့လုပ်ဆောင်ခြင်းဖြင့် OSM ၏ အချက်အလက်သိုမှီးမှုအတွင်းရှိ အကြောင်းအရာများ၏သမိုင်းကြောင်းကို ထိန်းသိမ်းရာရောက်ပြီး မြေပုံရေးဆွဲသူအချင်းချင်း လေးစားသမှုရှိရာလည်းဆောင်၏။ မြေပုံတွင်ဖော်ပြထားသော အကြောင်းအရာတစ်ခုခုကို ပယ်ဖျက်သင့်ကြောင်း အမှန်တကယ်ယုံကြည်ပါက မူရင်းရေးဆွဲသူ သို့မဟုတ် OSM သို့ အီးမေးလ်ပို့မေးမြန်းရန် ဦးစွာစဉ်းစားသင့်သည်။
ပုံသဏ္ဍာန်များရေးဆွဲခြင်း(Polygons)
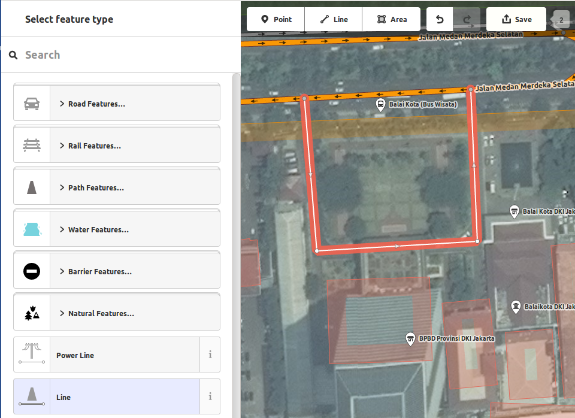
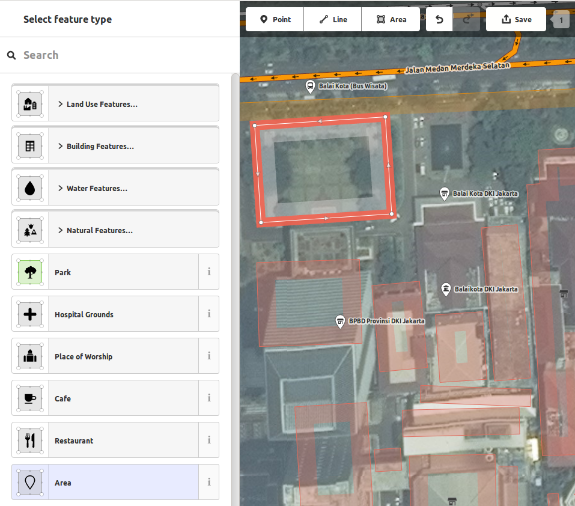
ပုံသဏ္ဍာန်အမျိုးမျိုးကို ရေးဆွဲရန်အတွက်Area ခလုတ်ကိုနှိပ်ပါ။ 
- mouse ၏ ညွှန်ပြကိရိယာသည် (+) လက္ခဏာသို့ပြောင်းလဲဖော်ပြမည်။ ပုံရိပ်ကိုလမ်းညွှန် အဖြစ်အသုံးပြုလျက် အဆောက်အဦ၏ပုံသဏ္ဍာန်ကို မှန်းဆယူပါ။
- အချက်အလက်ဖြည့်စွက်မှုပေါ်မူတည်လျက် ပုံသဏ္ဍာန်၏အရောင်ပြောင်းလဲမည်ကိုသတိပြုပါ။
- The tools that are available when you select a shape and activate the context menu with the right mouse button are similar to those when you click on a line.
iD Editor တွင်ရှိသော ပုံသဏ္ဍာန်အမျိုးမျိုးသည် လမ်းကြောင်းပိတ်(စမှတ်ဆုံးမှတ်တူ)များဖြစ်ပြီး ဖော်ညွှန်းချက်များပါရှိမည်ဖြစ်၏။ ယင်းကို “closed way” ဟုခေါ်သည်။
Drawing Multipolygons
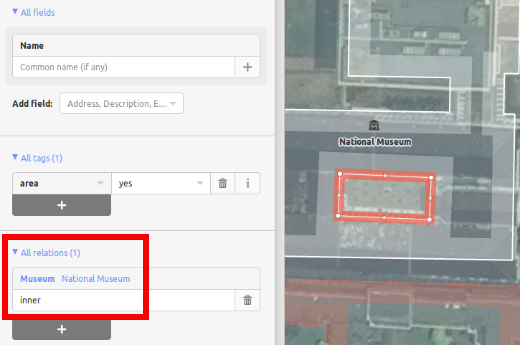
Sometimes you have to draw a polygon which does not only have an outer contour but also one or more inner contours. Just think of buildings with inner courtyards or lakes with islands. Do not draw all these ways in one line so that the inner contours suspend from the outer contour. Rather draw these contours separate, attach tags to the outer contour only, select all contours and hit c in order to combine them into what is called a multipolygon.
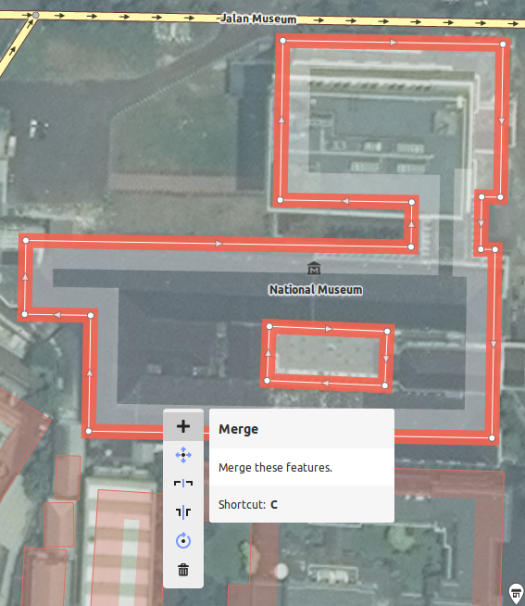
When you select any of the contours of the newly created multipolygon you can see on the left to which multipolygons it belongs
Issues
The editor performs a number of checks as soon as you edit something. If it thinks that what you did might cause problems it notifies you in the issues tab. Whenever the issues icon on the right carries either a yellow (for warnings) or red (for errors) dot you should open the tab and see what it reports. This information is also displayed in the object feature tab on the left if the relevant object is selected. You are also warned that there are unresolved issues when you upload your data.
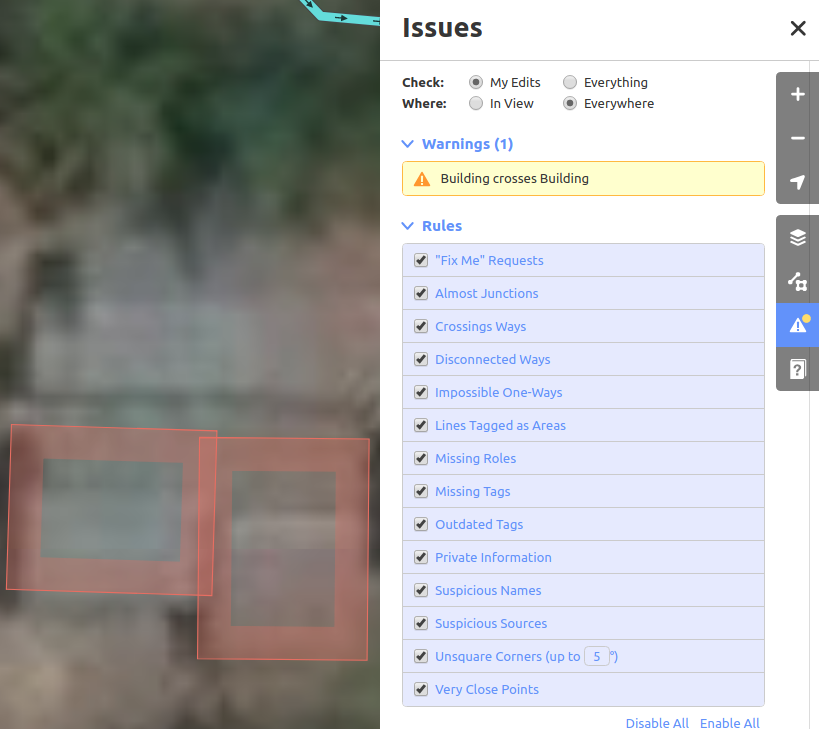

The lower part of the issues tab show the available rules and allows you to disable them individually though this is not recommended.
ပြောင်းလဲမှုများကိုသိမ်းဆည်းခြင်း
ပြုပြင်တည်းဖြတ်မှုကိုသိမ်းဆည်းလိုပါကSave ခလုတ်ကို နှိပ်ပါ။ မြေပုံ၏ဘယ်ဘက်တွင် OpenStreetMap သို့သိမ်းဆည်းရန်အတွက် ညွှန်ပြချက်ပေါ်လာမည်ဖြစ်သည်။
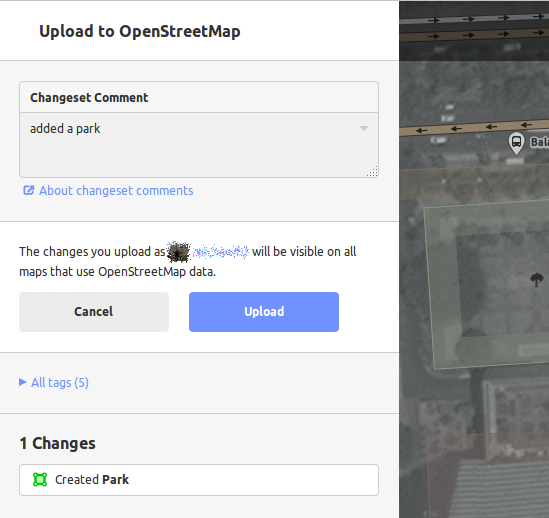
- တည်းဖြတ်မှုအတွက် ရှင်းလင်းချက်ရေးသားပြီးSave ခလုတ်ကိုနှိပ်ပါ။
အကယ်၍ မြေပုံနေရာတစ်ခုတည်းအတွက် ပြင်ဆင်တည်းဖြတ်သူနှစ်ဦးမှ တစ်ပြိုင်တည်း၊ တည်းဖြတ်မှုပြုသည့်အခါတွင် တိုက်ဆိုင်မှုကို ဖြေရှင်းပြီးသည်အထိ ခေတ္တစောင့်ဆိုင်းရမည်။ ပြီးမှသာ စိစစ်လက်ခံမည်ဖြစ်သည်။ တိုက်ဆိုင်မှုကိုဖြေရှင်းရာတွင် အခြားသူ၏တည်းဖြတ်မှုကိုလက်ခံရခြင်း၊ ပြန်လည်တည်းဖြတ်ရခြင်း တို့ပါဝင်နိုင်သည်။ (နောက်တစ်ကြိမ်တိုက်ဆိုင်မှုကိုရှောင်ရှားရန်အတွက် အချိန်ကုန်သက်သာစေသည်။)
ထပ်ဆောင်းသတင်းအချက်အလက်နှင့် မိမိနှစ်သက်ရာရည်ညွှန်းချက်များ
When you are editing an object, you will see an “Add field” menu at the bottom of the attribute panel. You can add various additional information by selecting one of the entries (layer, elevation, wikipedia etc.).
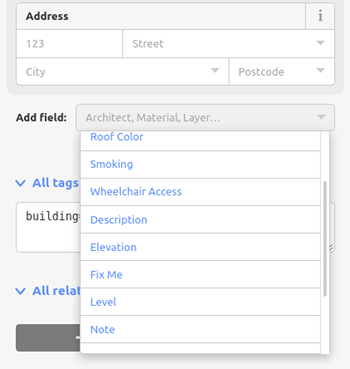
Or you can add custom tags by clicking All tags. 
- ရွေးချယ်ထားသော အကြောင်းအရာ၏လက္ခဏာရပ်အတွက် တွဲစပ်ဖော်ပြမည့်အညွှန်းများကိုပြသမည်။
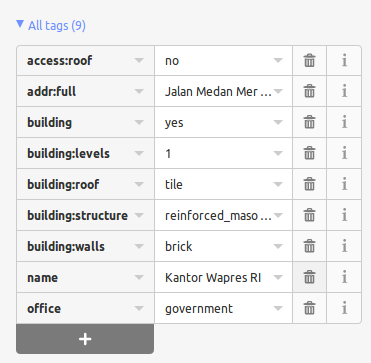
- အပေါင်း(+)လက္ခဏာနေရာကိုနှိပ်၍ အချက်အလက်နှင့်ယင်း၏တန်ဖိုးများကိုပေါင်းထည့်နိုင်ပြီး ပယ်ဖျက်လိုပါက အမှိုက်ပုံးသင်္ကေတကိုနှိပ်ပါ။
Further tutorials
Our external resources page provides links to a number of video tutorials from various sources.
iD Editor နှင့် JOSM ဆော့ဖ်ဝဲလ် တို့နှိုင်းယှဉ်ချက်
iD Editor ၏ အားသာမှုများမှာ…
- လွယ်ကူရိုးရှင်းသောတည်းဖြတ်မှုများပြုလုပ်လျှင်
- ပုံရိပ်ရယူရန်နှင့်တည်းဖြတ်မှုကိုသိမ်းဆည်းရန် မြန်ဆန်သောအင်တာနက်လိုင်းရှိလျှင်
- ရှိရင်းစွဲအကြောင်းအရာနှင့် ရိုးရှင်းသောဖော်ညွှန်းချက်အစီအစဉ်အတိုင်း လိုက်ပါဆောင်ရွက်လိုလျှင်
- သင်အသုံးပြုသောကွန်ပျူတာတွင် ဆော့ဖ်ဝဲလ်ထည့်သွင်းမှု အကန့်အသတ်ရှိလျှင် စသည့်အခြေအနေများတွင်သုံးနိုင်ပါသည်။
JOSM ဆော့ဖ်ဝဲလ်၏ ပိုမိုအားသာချက်များမှာ…
- အဆောက်အဦများစွာထည့်သွင်းလိုလျှင် (အဆောက်အဦများအတွက်သုံးသော ကိရိယာ plugin)
- ရှိပြီးသားပုံသဏ္ဍာန်များနှင့် မျဉ်းကြောင်းများကိုတည်းဖြတ်လိုလျှင်
- အင်တာနက်ချိတ်ဆက်မှုမရရှိလျှင်
- ကြိုတင်သတ်မှတ်ချက်များ ၊ သီးသန့်ရည်ညွှန်းချက်များ အတွက်အသုံးပြုလိုလျှင်
