Kartierung mit einem GPS-Gerät
Ein wichtiger Teil des Mappings ist das erlernen des Erfassens - wie man Informationen zur aktuellen Karte hinzufügt. Der andere Teil ist die Informationen selbst zu sammeln - das bedeutet raus zu gehen und einen Bereich zu erkunden.
In diesem Kapitel werden wir herausfinden, was ein GPS-Gerät ist und wie es funktioniert. Sie werden lernen ein GPS-Gerät zu verwenden und wie man damit Karten erstellt.
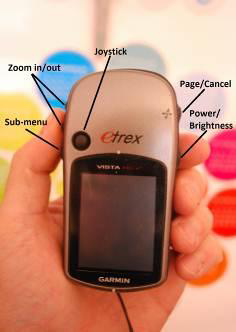
Wir werden hier erklären, wie man ein oft gebräuchliches Garmin eTrex Vista HCx verwendet. Es gibt viele andere GPS-Geräte, welche das gleiche tun, falls man mit einem anderen arbeitet. Keine Sorgen - die Prinzipien bleiben die selben.
Was ist ein GPS-Gerät?
Ein GPS-Gerät ist wie ein Mobiltelefon, außer dass man anstatt Radiosignalen von Telefonunternehmen signale von Satelliten rund um die Erde empfängt. Durch den Empfang dieser Satellitensignale, ist es einem GPS möglich, die exakte Position auf dem Planeten zu berechnen. Es zeichnet die Position in Koordinaten auf, dargestellt durch 2 lange Nummern. Eine Nummer sagt aus wie weit Ost oder West man ist - die ist die Longtitude. Die zweite Nummer sagt aus wie weit Nord oder Süd man ist - das ist die Latitude. Jeder Ort auf der Erde hat eindeutige geographische Koordinaten.
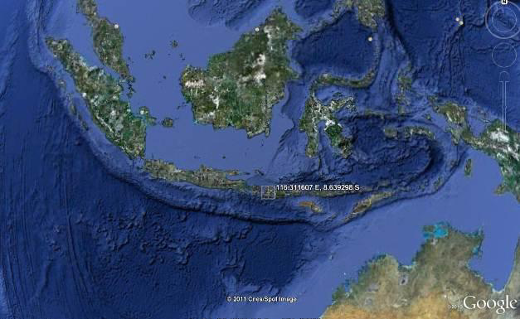
Zum Beispiel: -8.639298 Latitude (Breitenangabe), 116.311607 Longtitude (Längenangabe) ist ein Ort in Lambok, Indonesien.
Das GPS-Gerät in Betrieb nehmen
Bevor man sein GPS-Gerät anschaltet, geht man ins Freie um freie Sicht zum Himmel zu haben. Da das GPS seine Position durch empfangene Satellitensignale bestimmt, wird es im Haus nicht funktionieren.
Drücken Sie den Anschalter auf der rechten Seite des GPS. Das GPS wird starten und die Satellitenseite anzeigen- Sie sollten etwas sehen wie die folgende Grafik. Ihr GPS sucht nach Satellitensignalen. Wenn es zu drei oder mehr Satelliten Verbindung hat, wird es die Position bestimmt haben.
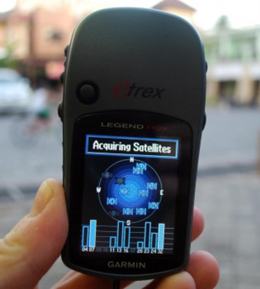
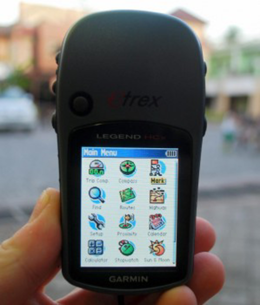
Sobald Ihre Position bestimmt wurde, wird die Satelliten-Ansicht geschlossen und Sie sehen das Hauptmenu.
Mit dem GPS-Gerät navigieren
- Das GPS hat unterschiedliche Ansichten und Menus welche verschiedene Dinge erlauben. Um zwischen Ansichten zu wechseln, drückt man den “X” Knopf über dem Anschaltknopf auf der rechten Seite des Geräts. Dieser Knopf dient auch dazu zurück zu gehen. Drückt man etwas aus Versehen und will abbrechen, drückt man den “X” Knopf.
- Mit Hilfe des “X”-Knopfes können Sie durch die verschiedenen Ansichten wechseln, was wie folgt aussehen kann:

-
Kehrt man zur Satellitenseite zurück, siehr man, dass man mit 3 oder mehr Satelliten verbunden ist. In der oberen linken Ecke sind Ihre Koordinaten, ihre Längen- und Breitenangaben oder Latitude und Longitude.
-
Flip to the Map page, and you can see a map of where you are. If you have added OSM maps to your GPS, you may see roads and places. Otherwise, the map may look quite blank. Zoom in and out by pressing the up and down arrow buttons on the left side of the GPS.
-
Further information where to obtain OSM maps for Garmin devices and how to install them can be found in the OSM wiki
Spuren und Wegpunkte
Your GPS records two kinds of information that are useful for creating maps or saving the coordinates of a place. First, it allows you to save your location in the memory of the GPS. When you save a location, the coordinates will be saved with a name. For example, your first saved point will be named 001, the second 002, and so on.
If your GPS does not start at 001 and you would like to clear the previous points, go to the “Find” icon in the main menu. Hit “waypoints” and then the submenu button on the right side to display the Waypoint submenu. Scroll down to “Delete” click “all symbols” and “Yes”.
When you save a point, you can write down the number on a piece of paper, along with a note about what it is, and any attribute or indicators you would like to know. Saved locations on your GPS are called waypoints.
Second, your GPS can save what are called tracks. While a waypoint only saves a single location, a track will save a series of locations wherever you move. For example, the track will record your location every one second, or every one meter, and the result will be a series of dots that show the path of where you have been. Tracks are useful for mapping objects that are represented by lines or shapes, such as the course of a road, or the shape of a field.
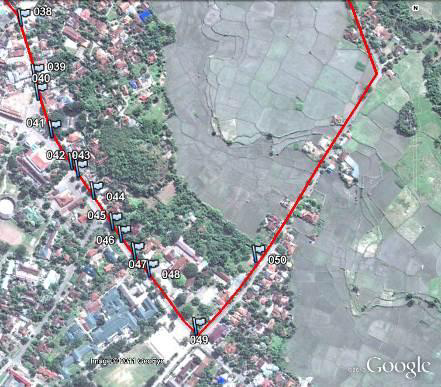
Eine Position speichern
- To save your current location as a waypoint, click the “X” button until your reach the Main Menu. Using the joystick, move it so that “Mark” is highlighted on the screen. Push the joystick button down to open the “Save Waypoint” page. Alternatively, you may press the the joystick button on any page until the “Save Waypoint” page opens.
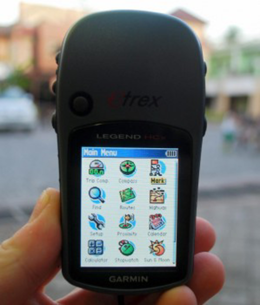
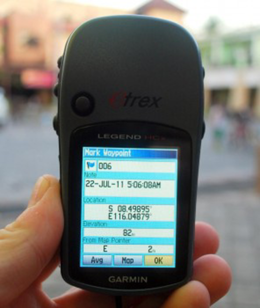
- You can see on this page some information about the waypoint that you are saving. First is the name. If this is your first waypoint, it probably reads “001”. This is the number you should record on paper along with the information you want to collect with this object. Next you will see the time and date when the point is recorded. Below that are the coordinates, followed by the altitude.
- Use the joystick to move to the “OK” button at the bottom of the screen. Press the joystick button down to save this point. Be sure to write down the number of the point, along with what the place is and any other information you want to record about the place in your notebook.
- Press the “X” button to go to the map page. You should now see your point on the map.
Aktivieren des Spurenprotokolls
- Now that we have learned how to save points, let’s learn how to turn the track log on and off. When the track log is turned on, it will automatically record your path. It’s good practice to turn on the log when you begin mapping, and turn it off when you are finished. You will then be able to look at the track on a computer and see the path that you mapped. If you would like to map the course of a road, it is a good idea to save a waypoint at the beginning and end of the road, writing in your notebook the name and type of the road, and any other important information about the road.
- To turn on the track log, click the “X” button until your reach the page that says Track Log.
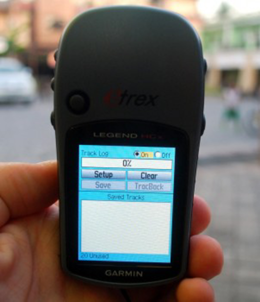
- If you would like to empty the track log to delete earlier recordings, use the joystick to select “Clear”, and press the joystick down. The bar at the top should read “0%”.
- To turn on the log, move the joystick to highlight “On”, and press the joystick down. The track log is now recording your path.
- Under the “Set up” option, you also can set time or distance intervals to track. Time intervals instruct your GPS to record your location at given intervals. If you have a memory card in your GPS, it is good practice to set this to 1 second, meaning that every second your location will be added to the track log. This may be useful when detailed surveys are needed.
- Press the “X” button to go to the map page. As you move you will see your track shown as a series of dots.
Wegpunkte und GPS-Spuren auf den Computer kopieren
When you are finished mapping with the GPS you will want to copy the points and tracks to your computer so that you can open them in JOSM.
One way to copy the waypoints and tracks is to you use the free software that Garmin provides, called BaseCamp. It can be downloaded here. However, in this section we will use a program called GPSBabel, which offers a few additional features.
###
- First, turn off the track log on your GPS, by going to the track page and selecting “Off”.
- Attach the GPS to your computer with the cable. One end should plug into your computer’s USB port, and the other goes into the back of the GPS, beneath the rubber flap at the top. The GPS should be turned on to copy the points and tracks.
GPS-Treiber installieren
- You may need to install GPS drivers on your computer. You can download the drivers at the Garmin Website.
- Click “Download” to get the installation file. Locate it on your computer, and double-click to install.
Linux systems (at least Fedora) do not need special drivers to communicate with a Garmin device (at least the eTrex Vista HCx). Just make sure that your Garmin is powered and plug it into your compure with a USB cable. You can use GPSBabel (as instructed below) or GpsPrune to grab the saved data from your device.
GPSBabel-Setup besorgen
- GPSBabel is a program that allows us to copy data from the GPS. If you have a copy of GPSBabel on a CD or usb flash drive, you can skip to the next section.
- If you don’t have GPSbabel already, open your web browser and go to www.gpsbabel.org
- Klicken Sie auf “Downloads” oben auf der Seite.
- Scroll down the page. If your computer uses Windows, you want to download the installation file for Windows. Click “GPSBabel-1.5.2-Setup.exe”. The file will be downloaded to your computer.
GPSBabel installieren
- Öffnen Sie die gerade heruntergeladene Datei mit einem Doppelklick.-
- Klicken Sie auf “Next”.
- Klicken Sie auf “I accept” und “Next”.
- Drücken Sie weiter auf “Next” bis das Programm anfängt zu installieren.
- Wenn das Programm fertig installiert ist, klicken Sie auf “Finish” um GPSBabel zu starten.
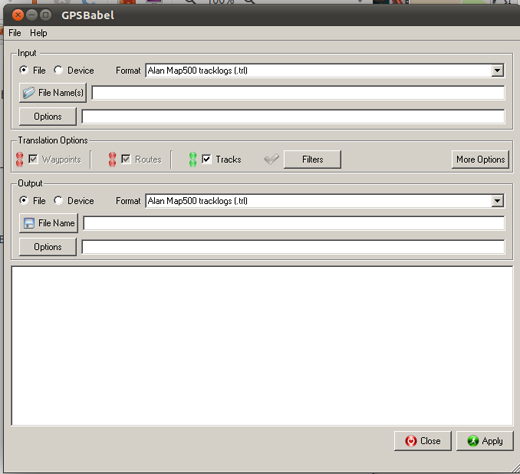
Spuren und Wegpunkte kopieren
- Click in the circle next to the word “Device” at the top of the window.
- In the dropdown menu labelled “Format”, select “Garmin serial/USB protocol”
- Go down to the middle of the window, under Output. In the dropdown menu labelled “Format”, select “GPX XML”:
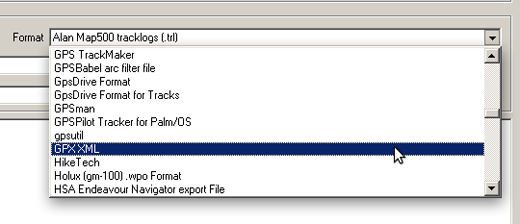
- Click “File Name” and type a name for your saved file. It should be something that describes the data, such as the date and the location. For example, jakarta-07-07-2011
- Stellen Sie sicher, dass das GPS-Gerät mit dem Computer verbunden und eingeschaltet ist.
- Klicken Sie auf “Apply” in der unteren rechten Ecke in GPSBabel.
- If all goes well you should see a bar move across the screen, indicating that the data is being retrieved from the GPS. When it is finished, your points and track will be saved in the file that you selected.
Daten in JOSM öffnen
Als nächstes starten Sie JOSM. In dem oberen Menü, wählen Sie “Datei” und klicken auf “Öffnen…”-
- Wählen Sie die Datei aus, die Sie mit GPSBabel erzeugt haben und klicken Sie auf “Öffnen”.
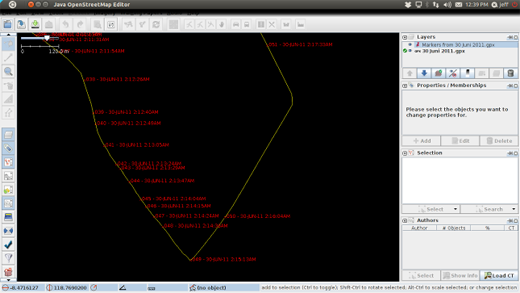
- Sie sollten jetzt Ihre Wegpunkte und Spuren in JOSM sehen.
Zusammenfassung
Congratulations! You should now have an understanding of how to use the GPS. If you haven’t already, practice saving points of some important locations.
In this section we learned how to collect points and tracks and open them in JOSM. Later, we will use this information to add new places to OpenStreetMap.


 Zum Anfang der Seite springen