|
|
Tasking Manager – návod pro maperyPokud uživatelské rozhraní, které používáte, vypadá jinak, než zde popsané, měli byste se podívat na přehled verzí
Tasking Manager je nejoblíbenější nástroj pro spolupráci a koordinaci mapování OpenStreetMap.
Široce používaný HOT Tasking Manager můžete použít k okamžitému zapojení se do mapování pro humanitární organizace a pro jejich práci v terénu. Tasking Manager je jen jeden software z celého ekosystému OpenStreetMap. Během přispívání do OpenStreetMap přes Tasking Manager, používáte vlastně několik softwarových nástrojů:
Účelem Tasking Manageru je zobrazit konkrétní zeměpisnou oblast a rozdělit ji na malé plochy ke zmapování, zvané “úlohy” (anglicky “tasks”). Tyto úlohy mohou být zamčeny maperem, aby zabránil tomu, že jiný přispěvatel bude mapovat stejné objekty, čímž by vznikala duplicitní data nebo docházelo ke konfliktům. Jakmile je mapování v této malé ploše dokončeno, maper to nahlásí zpět Tasking Manageru. Poté už může maper vybrat novou úlohu, kterou bude pokračovat své přispívání do OpenStreetMap. Zkušení mapeři zkontrolují každou úlohu a ujistí se, že kvalita dat přidaných do OpenStreetMap je přijatelná. Nakonec označí úlohu jako zvalidovanou a nebo ji vrátí ostatním maperům s instrukcemi k opravě. Rychlý návod
Proces mapování
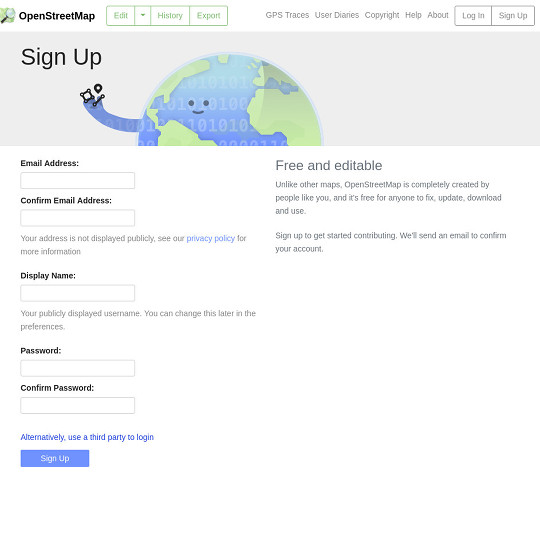
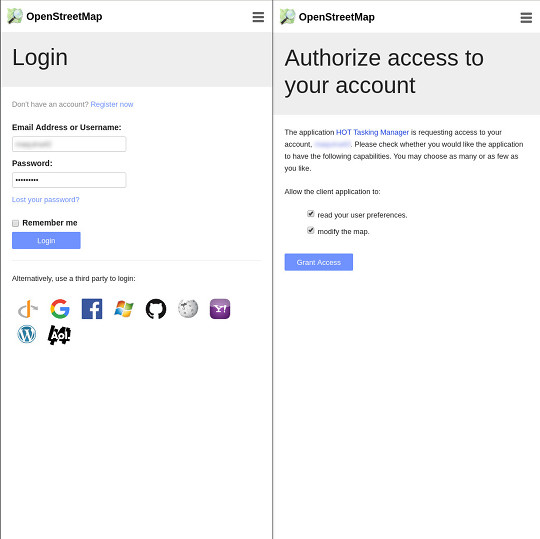
Přihlášení do Tasking ManageruTasing Manager je speciální nástroj, který koordinuje mapování OpenStreetMap. Využívá při tom přihlašovací systém OpenStreetMap. To znamená, že si nemusíte vytvářet zvláštní uživatelský účet, abyste mohli používat Tasking Manager, ale musíte si vytvořit účet v OpenStreetMap a přihlásit se na OpenStreetMap.org předtím, než začnete mapovat přes Tasking Manager. Když navštívíte domovskou stránku Tasking Manageru, máte v pravém horním rohu obrazovky na výběr mezi tlačítky V případě, že už máte účet v OpenStreetMap, vyberte
Otevře se nová karta, která vám umožní zaregistrovat se na OpenStreetMap.org. Zadejte informace o svém účtu a stiskněte tlačítko
Zavřete kartu a přejděte zpět na Tasking Manager. Klikněte na tlačítko
Nastavení
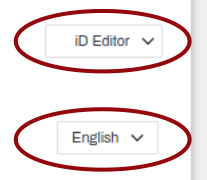
Tasking Manager se na začátku zobrazí v angličtině – pro přepnutí do jiného jazyka klikněte na English. Zde můžete také;
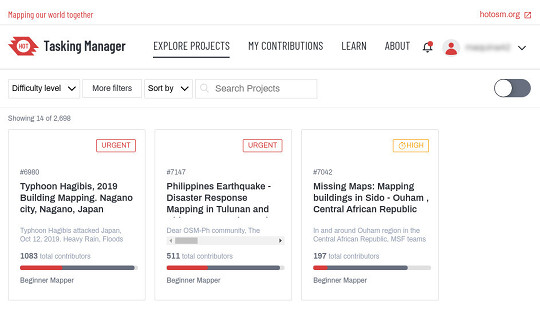
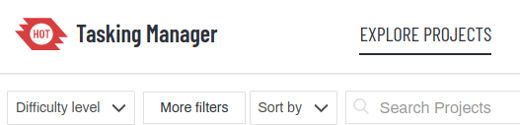
Nalezení projektu
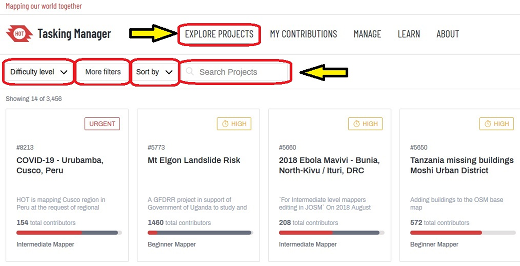
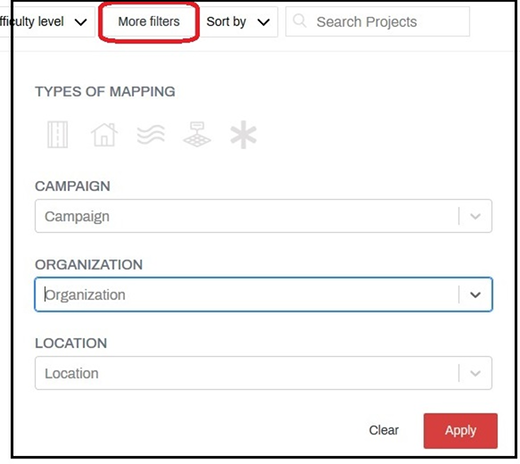
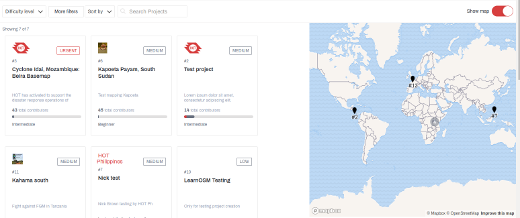
The Tasking Manager Project list screen is divided into three main areas:
Search and Filter OptionsBy default all the projects available for mapping are displayed. You can use the Search filters section of the screen to further narrow down the projects that you would like to work on.
Map View If you choose to show the map, you can view a map of the world showing where the projects are, or a disk indicating the number of projects in an area. Zoom in for more details, and you can select a project by clicking on its link from the map.
Project overview page
Icons indicate the types of mapping, such as:
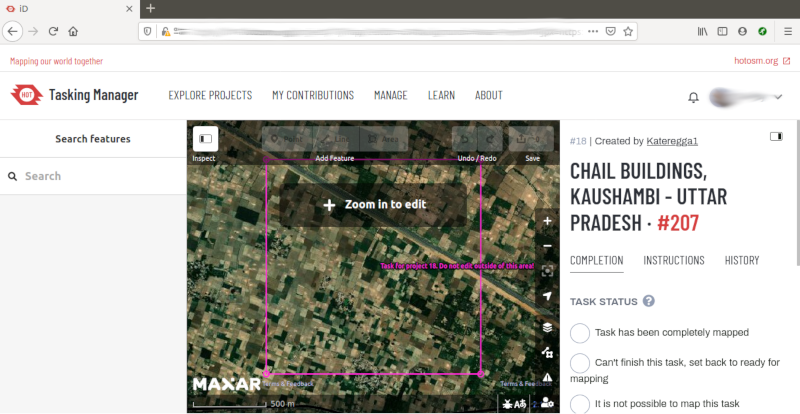
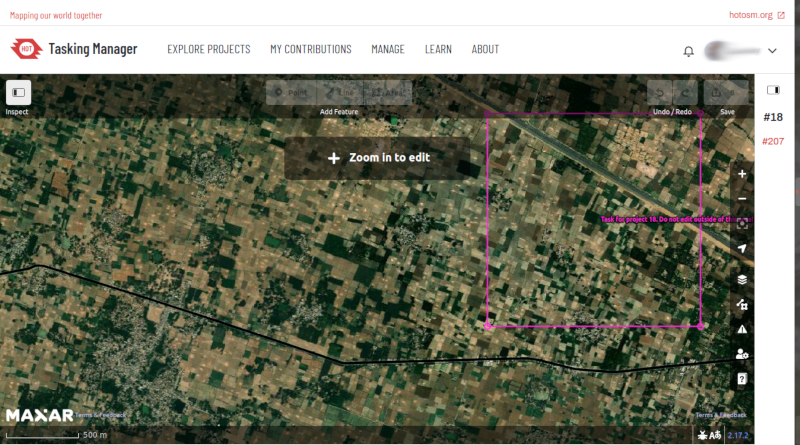
Project tasks pageThis is your main screen for working on a project. The screen is divided into two parts. The left section is a tabbed panel with tabs for:
The right side of the screen is a map showing the tasks (often squares) coloured according to their status. Tasks that are available to you can be selected by clicking on them.
Although you may have set your preferred editor within your preferences page, you do have the option of changing editor just for the task you are about to select. Choice of EditorsDifferent options for editing are presented to you as soon as you lock a task. Edit with JOSMStart JOSM before using this link and it will automatically load the existing OSM data into JOSM.
iD editorSelect this to automatically start the OpenStreetMap iD editor within the Task Manager of your web browser, with existing OSM data loaded. The Internet Explorer web browser does not currently support iD and it will load Potlatch 2 instead. Potlatch 2The editor will load in a new window or tab. Potlatch will not automatically display the task bounding box at this stage. Field PapersFor use only when you are involved in a project where a local mapper has carried out a ground survey and marked a printed map with information such as road names. This map can be rescanned and used as a background image for a remote or local mapper to read the information and update the OpenStreeetMap data Field papers section of LearnOSM. Select a task to map
Just to confirm - Clicking on the Start Mapping button, or locking your square from the map, locks the task so that no other mapper can select it until it is released again, and starts a 2 hour (120 minute) countdown timer, at the end of which time the task is automatically released. It is easy to become engrossed in your mapping and not realise your task has been released, and has now been selected by another mapper who has started mapping it too. This can lead to conflicts and problems.
Splitting a task squareHaving selected your task and inspected it with the imagery in place, you may realise that there is far too much detail required for mapping. An example of this may be tracing buildings in dense urban areas, or locating small villages in large areas. As guidance, where it isn’t possible for one person to complete within the 2 hour time limit you can often split the task into 4 smaller areas. Use with caution - if/when task squares are split too small it is difficult to judge what type of highway is involved, and to identify other features.
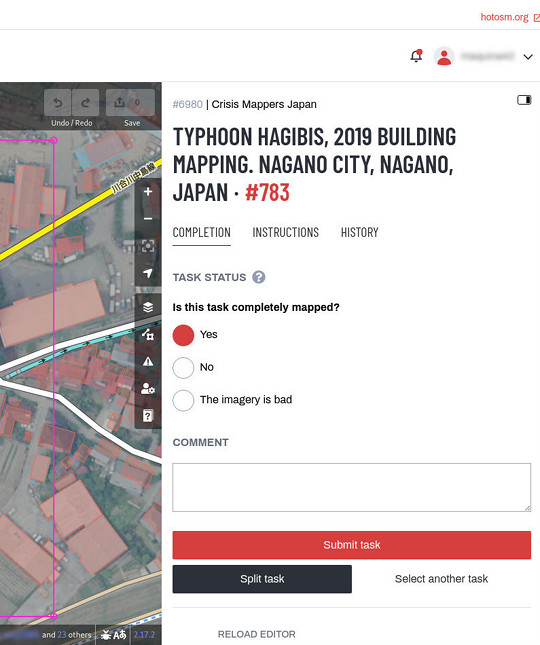
Submit your mapping task
Unlocking a Task before it is completeIf you start working on a task, but cannot complete it for some reason, it is best practice to leave a comment in it. Simply detail what remains and choose For example: If you didn’t map at all, you can just go back without leaving any comment by choosing Submit a task that is completely mappedOnce you are done you can save all changes to OpenStreetMap:
Marking a Task as Bad ImageryYou will sometimes select a task that can not be mapped because the imagery is low resolution or has cloud cover. In this case please indicate Sending a message from the comment boxWhen leaving a comment against a task, you can have the comment sent as a message to a named mapper. Much like Twitter, simply use an @ followed by the username. This will send a message to the user containing the comments from this box, plus a link to the task that the comments box relates to. For example: This is particularly useful when validating or adding on another’s previous work - you can provide feedback, thanks or more.
Getting helpFor questions which might require a little research to answer or more detailed explanations, usually the best channel is to write to mapper-support@hotosm.org Live text based help
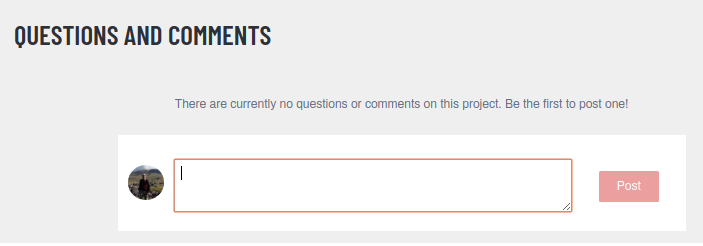
Leaving a Project question / comment / contacting the Project creatorUsing the “Comments” tab for the project you can see other users’ questions and comments and leave one of your own. All comments are public and it is not live chat. Use the Slack option above if you need immediate attention.
Editing hints and tipsBy now you have a good understanding of what the Tasking Manager is, and some of the various functions it supports. Unlike normal editing, this tool is often used for time critical projects with many participants - this may be a little bit different to what you are used to. Some general advice to heed when working in this tool:
ValidationValidation is the process of an experienced mapper reviewing the mapping of the initial mapper of a project task. It is designed to confirm that the mapping is complete and the quality of the data is good. It is also there to give encouragement to mappers by thanking them for their time, confirming that their mapping is good or giving instructions on how to improve their mapping. The most effective practice is to find beginner mappers at the early stages of their mapping, putting their mind at ease and giving them confidence by confirming that they are doing the right thing, or helping them to correct any errors that they may have before they have mapped too many tasks. This reduces the amount of fixing required at a later stage to get their mapping up to standard and gives them the encouragement in knowing that they are supported in what they are doing. Your User ProfileThe Tasking Manager 4 has a number of changes that affect the data available for doing validation. Please make visiting your user profile your first activity in the new Tasking Manager, by selecting Settings from the popdown menu under your OpenStreetMap (OSM) user name in the upper right corner. • Under Personal Information make sure you have filled in your preferred email address. • Under Settings switch on Expert Mode and select your default editor and preferred language. • You can also choose what notifications you wish to receive. Getting StartedTo get started click on Explore Projects on the top bar of the page. On the Projects page you can click on any of the projects to go to that project or you can use the range of filters for selecting the project or projects you wish to see or select from.
After filtering and/or selecting the project you want to work on, scroll down to the bottom of the next page to Questions and Comments to see any messages left by previous mappers/validators regarding the project. Then in the bottom right click on the red button Contribute to move to the next page. This page should open with the project instructions visible (1). If not then select Instructions. Read the instructions to understand what imagery is to be used and what the mappers have been asked to do. This will give you an understanding of why the mappers are mapping the way they do and if the instructions are misleading and the mappers are consistently getting it wrong because of that then you can contact the Project Manager to change the instructions to reduce the effects of that happening.
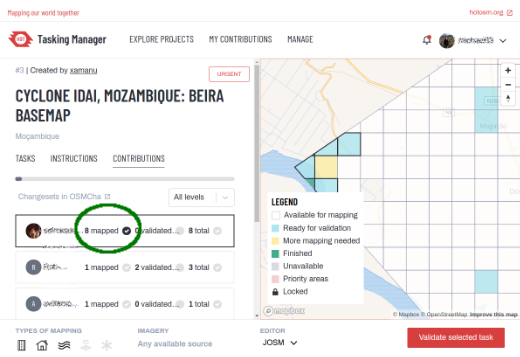
Check that you have the correct Editor (2) Select a blue task to validate (3) Click on the red button Validate selected task at the bottom right (4) A new page will open in the Tasking Manager and the selected task will be loaded into your editor. On this page your task will have a red padlock, other tasks locked will have black padlocks. You are still able to access the Instructions on this page. You can see who has mapped or validated this task in the History and access their profile and statistics by clicking on their name. Selecting Multiple Tasks for ValidationIf the mapper has more than one task completed then they will be selected on the map if you press on one of the numbers. You can download all the tasks in one go to validate. They will automatically adjust your JOSM/iD window to accommodate all of them.
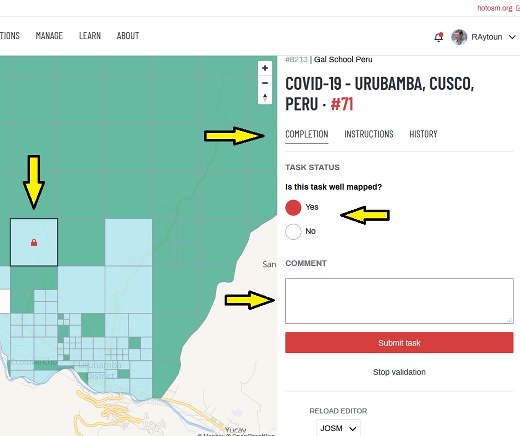
Depending on which editor you are using, this feature will behave differently. In JOSM, a second OSM data layer will be created titled “Task Boundaries - Do Not Edit or Upload” and it will have uploading disabled in recent versions of JOSM. JOSM will not download the OSM data because it could be a very large amount of data. Instead you will have to use the task boundaries as a guide and download the data to the active editing layer manually. Finalizing ValidationTo validate/invalidate a task you need to select Yes/No under Is this task well mapped, then enter your comment, then click the red button Submit task to save before selecting another task. If you want to leave without changing the status of the task leave a comment then click on Stop validation.
For those two choices you can and should leave a friendly, encouraging comment addressed to the mapper(s) involved and provide thanks for their contributions and feedback on their mapping. Please be considerate before marking a task as invalid. If just a few bits are missing add them yourself, explain what was missing in your comment but nevertheless mark the task as valid. New mappers will consider their completed task marked as invalid as a fairly harsh comment. You can access a mapper’s statistics on their profile page at https://tasks.hotosm.org/users/username.
Byla tato kapitola užitečná?
Napište nám a pomozte vylepšit naše návody!
|


 Alternativně, můžete vybrat úlohu z mapy a zvolit
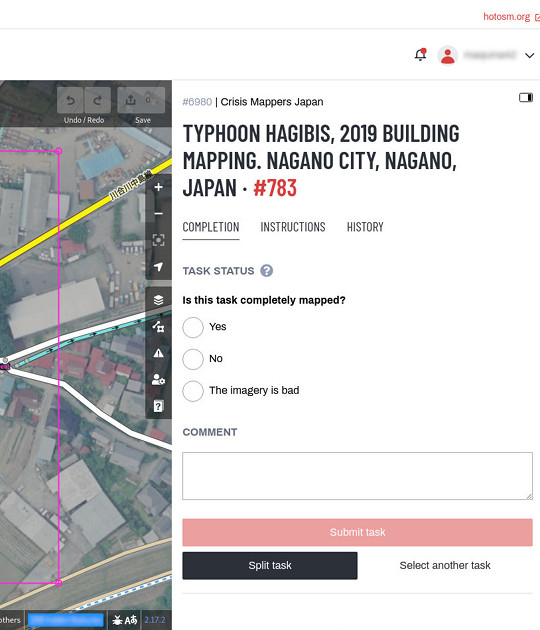
 Po tomto kroku můžete jít zpět na krok číslo 7 a vybrat novou úlohu k mapování. Děkujeme za vaše přispění do OpenStreetMap!
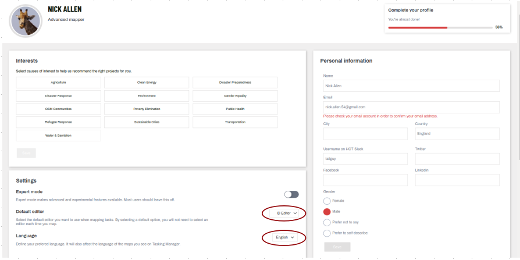
 .
. Tlačítko
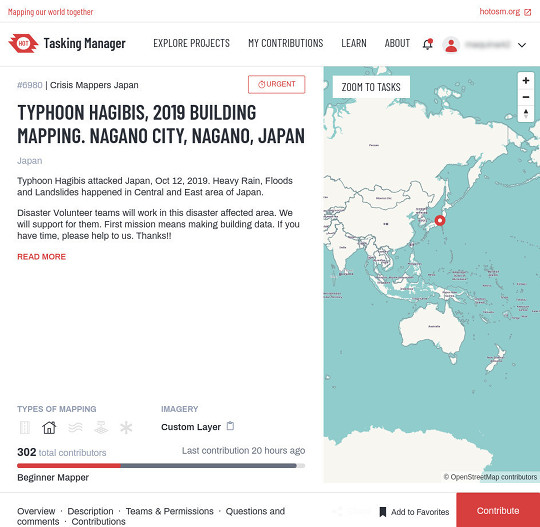
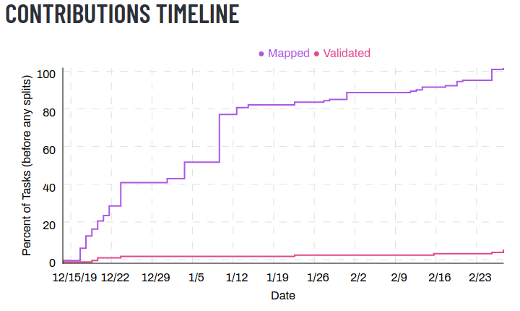 Once you have located a project of your interest, clicking on it will take you to the overview page for that project. Read the description carefully and scroll down for more information, such as the organization who coordinates the mapping for this project, who can map or validate, any comments about the project, a progress graph and the list of contributors.
 The
The 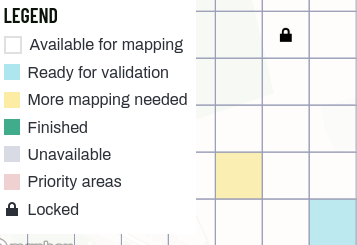
 are locked by another mapper
 The button
  Once you have locked your Task, and your square (Task) boundary shown. You can still click on the tabs for: